Final Project: Dollhouse

12/16/12

Read about the whole project at http://kstritzdpa.wordpress.com/

Here are the shots that I was responsible for.

Attack

Attack24.png0116

Attack24.png0001

ScaryFaceFull

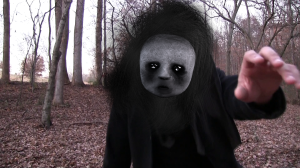
My job for the character design included modeling, texturing, rendering, and animating dollface. I used the image of the real doll to model dollface.

IMAG0302

Then I painted a detailed UV map.

DollfaceUV

I used the particle hair renderer from Blender to create the hair. I tried to make it dynamic by sliding side to side as dollface is approaching the camera, but the tracker made the movement very bumpy which made the hair look strange. The hair , face, and background were rendered on their own separate layers as .pngs.

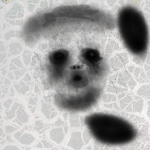
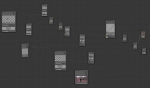
In order to track Gene’s face, I put a couple of post-it notes on the sides of his face but a few kept falling off. It worked out ok because I was able to track the corners of his eyes and mouth. Blender requires 8 markers to track and I had to do a lot of manual tracking.

FaceTracker

For rendering the face, I used Blender’s new Cycles engine, which is basically a real-time GPU-based global illumination renderer. Luckily, I have a new video card with a ton of cores so it rendered pretty fast, even with 400 samples per pixel. However, the strand renderer is not supported in Cycles yet so I rendered a separate layer. Motion blur is also not supported in Cycles yet either so when I composited the hair, face, and background, I had to also render the meshes as well in order to get the motion vectors. I originally wanted to use .exr files, but they were too big and I was using dropbox so storage space was an issue.

Attack24.png0129

AttackTree

Climbing A

ClimbingMaskedA2.png0261

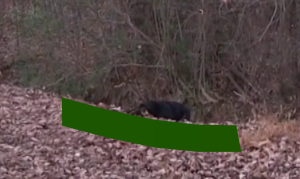
The climbing shot was very difficult to track so I split it up into two parts. The first part only shows his hair as he rises above the hill. For this shot to work, I had to track the scene and the face. The scene markers made it so the alpha mask would follow the camera while the face markers set position and rotation keyframes for the face and hair. The green mesh is the mask in this shot.

ClimbingAMask

Climbing B

ClimbingB7.png0233

This shot was also difficult because Gene’s nun outfit kept getting in the way of the markers. I went frame by frame to make sure the trackers followed correctly. The rotation wasn’t completely solved so I had to keyframe an animation where his face turns towards the camera.

ClimbingTracker

ClimbingTree

News Story A and B

NewsStoryAFinal.png0803

NewsStoryBFinal.png0718

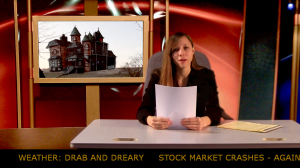
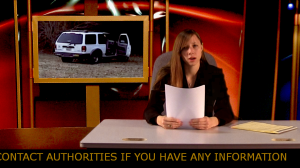
Both of these shots were not too difficult to make but they did take a long time to render. Karen did the news report in front of the green screen and there was minimal green spill. I used Blender’s new node to key out the green screen and the translate node to scroll the text at the bottom. Luckily the camera was in 24p so I did not have to de-interalce the video. The background is a static image with the car and dollhouse super imposed on top. I composited some grain to make the background not look static.
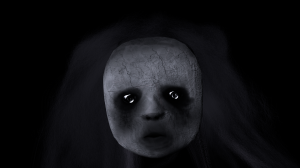
NewsStory2Tree

Final News Shot

NewsStoryB2.png0728

ScaryFaceTV

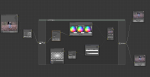
The final scene shows the empty room with the news story on it. All I had to do was translate, rotate, and scale the news story into the TV and did a little bit of color correction. It also has the scary face pop up at the end.
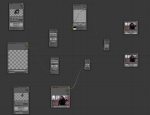
Editing

I was not tasked with editing, but it was not done in time so I took it up. I first tried to edit it in Final Cut even though I had never used it before. It was absolutely terrible compared to Blender’s video editor, so I quickly switched to Blender. For all of the outside shots, I put the frames through a node group, which is the same as a gizmo in Nuke, that handled the color correction, balance, vignette, and a slight lens distortion. I also had to cut out all the sound and tried to sync them with the video.

Then I made a quick title and credits screen.

Title

CreditsScreen3

ColorCorrectTree

Problems

The first major problem was that the camera switched itself to 1080 interlaced at 59.94FPS for the outside shots. We have no idea how it got switched back so I had to de-interlace and resample each video down to 24FPS. Tracking was also a big problem, but I was impressed with Blender’s motion tracking. It was able to solve pretty quickly and mapped the 3D models into 3D space almost automatically. I had my shots done a week ago, but the other shots were not done until the day it was due which left no time for editing. Rotopainting does take forever, but that should have been taken into account beforehand.

Conclusions

This was a very fun project, albeit a fairly ambitious short film. Karen’s storyboard and directing were great and the actors did a good job. I was not that impressed with the earlier scenes in the film and not happy that they weren’t done until the day before it was due. It was stressful to rapidly edit the film, but good experience. I also found that there was nothing that Nuke could do that Blender couldn’t do better and faster, which goes for Final Cut and Maya as well. I understand those tools are industry standard, I just think it’s funny how Blender is objectively better than all of them combined at no cost.

Project 5 – Army Compositing

By Jeff Bertrand

11/27/12

For this project, we were to mimic the army effect in CherryCase’s music video called “War Song”. The shot consists of multiple shots of the same 5 army guys in the distance marching up to the hill. I rotopainted each shot where the soldiers walked up to. I started from the end frame to make sure all the soldiers were inside the mask. Each one of the masks needed varying degrees of increased contrast and decreased saturation. The only big problem I had was shot 8 would not work in Nuke for some reason so there is a gap where the soldiers should be.

Nuke tree

Project 4 – Compositing Render Passes

By Jeff Bertrand

11/13/12

For this project, I used pre-rendered shots from the “The Water is Always Bluer…” DPA project to composite a final video. I used .exr files for each pass: AO, background, duck, duck matte, bill matte, claw and claw matte.  The claw and the duck both used AO and they were combined with the matte before being merged into the main trunk. The duck’s bill was too yellow, so I changed the hue to more of an orange and increased the saturation. The duck’s body color was very similar to the background so I used the matte to color correct the duck’s hue until it was a brighter yellow than the background. I used a multiply merge for the steam at the bottom of the trunk. Finally, I did a small Gaussian blur and a little bit more color correction at the end.

Problems: I thought that I had to use the ZDepth channel of the .exr files in order to make the water appear to be on top and behind the duck at the same time. It turns out the matte already took care of of that, so I merged the matte with the beauty pass using a mask operation.

Nuke tree

Project 3 – Tracking

By Jeff Bertrand

10/30/12

Matchmoving

This video is a composite of a simple explosion on top of a clip from The Avengers. The explosion was created in Blender with a particle system and lighting for the flash. It was difficult to find a place in the clip for good matchmoving because the camera was moving so much and creating a lot of motion blur. I choose this part of the clip because I was able to get steady markers on the ridges of the building which allowed me to map the movement of the camera to the virtual camera in Blender. As the Blender camera moves, the explosion appears to follow it as opposed to staying in one place. I added motion blur and glare highlights to the explosion in the final composite.

Still image

Tracking

[Updated Version]

Here is the updated version of the ski lift. This time I used the Blender motion tracker to follow the lift as it crosses the frame. Once it was tracked, I was able to put Bob back in the seat and make a mask to cover up the back of the lift. I also blurred and darkened the color to match the other humans.

[Old Version]

For this video, I added a virtual human character to the ski lift that appears to ride along with it. There is a static hold out mask that blocks the view of the character while he is behind the pole.

Still image

Stabilization

I used several markers to stabilize a video from a subway.

Project 2 – Simple Compositing with Sequences

By Jeff Bertrand

10/8/12

For this project, we were to composite a series of live footage with cg elements. The story for my sequences is a car taking off, speeding down the highway and crashing in the end.

Live on CG

I used my BMW M3 model with the smoke from the green screen footage to simulate acceleration. First I made the scene in Blender. I surrounded the model with grass and sky textures so the reflections would show up on the car.

Then I made a matte of the smoke using a combination of blurring, color correction, translation, and scale.

Then I rendered and animated the car. Here is a still from the video.

CG on Live

For this video, I used the M3 model following a path that is similar to the stock footage of Mauna Kea. I built the scene around the vehicle so that reflections would show. The scenery is not rendered in the final image, but the car still picks up the reflections.

In order to simulate the shadow underneath the car, I built a semi-transparent road that matches the curvature of the highway. The road was rendered in the final image, but with opacity set to about 40%. I still had a 3D model of the road underneath so that there were dark reflections on the bottom of the car, but that model was not rendered in the final.

The animation did not look very natural without motion blur, so I added some in the final image.

Live on Live

The final video is the car exploding after speeding along the highway. The ridge of the road naturally blocked the bottom of the green screen footage so the explosion looks like it was part of the scene. The top of the explosion was cropped in the original footage so putting the explosion near the top mitigated the problem. Here is the matte of the explosion.

And here is the final image with the matte color corrected on top of the original video.

Source footage

The original source footage was downloaded from 3 different sites. This video has each of them appended together.

1. Mauna Kea stock footage

2. Explosion

3. Smoke

Project 1: Image Compositing

By Jeff Bertrand

9/18/12

Overview: Composite 3 different images using live or cg elements.

CG on Live

For this image, I found an architectural interior shot online and I wanted to composite a cg clock onto the wall. The left wall had a lot of empty space and a light coming from the top which made it seem like it should have something on it.

I modeled and rendered a pendulum clock in blender using this base image.

And aligned and lit it using Blender’s Cycles renderer with 5000 samples.

I also did a shadow pass in Blender by cropping out a section of the original picture and using it as a normal map.

UV mapped it to a plane right behind the clock to simulate the roughness of the wall and rendered a shadow pass.

Here is the final image with all of the elements combined and color corrected.

Live on CG

For this image, I found an image of a comedian in front of a green screen

And modeled a stage in Blender

Then a made a matte

Then I combined, color corrected, eroded the edge, blurred both the foreground and background to get this final image

Live on Live

For this image, I used a concert as a base image

I found this goofy green screen image

Created the matte

Then color corrected, scaled, translated, eroded the edge and blurred to get this final image

Final Project: RenderMan

By Jeff Bertrand

5/4/12

Final Image:

AO Pass:

Problems:

Not having access to RenderMan outside of the lab and having to miss the days that we went over RenderMan.

Textures:

RenderMan shaders:

/***
guitar.sl
by Jeff Bertrand
5/4/12

Surface shader for RenderMan
Tiny noise speckles on guitar finish
***/

surface guitar( color guitCol = color(0.8 0.823, 0.93);
float guitFreq = 20;
float label = 0.5;)
{

color sc
point Pshad = transform(“shader”.P) * guitFreq + label;
float smallNoise = noise(2 * Pshad);

color darFinish = guitCol – 0.025;
color midFinish = guitCol;
color lightFinish = guitCol + 0.025;
sc = spline(smallNoise, darFinish, midFinish, lightFinish);

Oi = Os
Ci = Oi * sc

}

/***
floor.sl
by Jeff Bertrand
5/4/12

Surface shader for RenderMan
Rough noise on the floor
***/

surface floor( color floorCol = color(0.19, 0.114, 0.077);
float floorColorFreq = 4;
float label = 0.5;)

{

color sc
point Pshad = transform(“shader”.P) * floorColorFreq + label;
float smallNoise = noise(2 * Pshad);

color darBrown = floorCol – 0.025;
color midBrown = floorCol;
color lightBrown = floorCol + 0.025;
sc = spline(smallNoise, darBrown, midBrown, lightBrown);

Oi = Os
Ci = Oi * sc

}


/***
bedding.sl
by Jeff Bertrand
5/4/12

Displacement shader for RenderMan
Low noise frequency to produce large ripples in bed sheets
***/

displacement bedding( uniform float Km = 0.05;
uniform float noiFreq = 2;)
{

float noi;

noi = noise(transform(“shader”.P * noiFreq));

P += normalize(N) * noi;
N = calculateNormal(P);

}


Project 6: Advanced Rendering

King’s Treasure

By Jeff Bertrand

4/26/12

Current image

The goal for this project was to incorporate advanced rendering techniques such as reflections, refractions, and caustics. I didn’t have any major problems with this project, it just took a long time to render. I will upload newer renders as they are complete. It also took a while to get the caustics to work properly but they seem to be working now.

AO Pass

Textures

Project 5: Texturing

Project 5: Texturing a fruit bowl

By Jeff Bertrand

4/5/12

Final image

I didn’t have any major problems with this project. I tried to do a depth pass in order to composite depth of field, but that did not work out. This .mb file allowed me to use the Maya internal software renderer, but I went with mentalray for the final image.

I composited the scene with Blender.

AO pass

I mostly used textures from cgtextures.com and google image search


Architectural Lighting

By Jeff Bertrand

3/13/12

The primary focus for this project was to accurately light a scene from the natural history museum and my scene featured a triceratops skeleton.

Problems encountered:

I didn’t have a lot of major problems with this project and overall it was pretty fun. Maya crashed at the worst times, but I am used to it now. I turned auto-save off when working from home on the Maya student edition because Maya insists on reminding me every 5 minutes that the license that I have is a Student version and it makes me stop work and click yes in the dialog box.  I was trying to get ambient occlusion and refractions to work but had no success. I was also forced to use mentalray, the Maya software renderer did not want to work for some reason. I did a little bit of compositing and color correction in Blender after it was done rendering in Maya. I never did capture my intended lighting in the background, but I think the foreground lighting on the triceratops was successful.

I obtained two textures from cgtextures.com and made them seamless in Gimp.